Have you ever had the desire to create a cool signature on a forum, an animated banner, or just something that moves? Here I will tell you how to create an inscription, giving you skills that will serve as the foundation for further experimentation. You can create such things with Adobe Photoshop and Adobe ImageReady. My tutorial will show you how to do something like this:![]()
This tutorial consists of two parts: Photoshop and Image Ready.
Part1:
1. Open Photoshop .2. Create a new document having the size of 750x50 (pixels).
3. Select Type Tool
4. Type the text: “Pink elephants are frolicking about the room... running and leaping, the pigs are happy.”
5. Duplicate the layer twice (Layer > Duplicate Layer…). Rename the created layers something like "1" and "2".
6. Rasterize "1" and "2" layers (click on "1" layer and then Layer > Rasterize Layer > Layer. After which you should repeat the same procedure with "2" layer)
7. Now hide each layer except "1". (click on the eye near the layers you wish to hide) After that select "1" layer (left button click on it).

8. Select Rectangular Marquee Tool
9. Now with the help of this tool, while pressing and holding shift, select the letters in the text (the length and width selected for every letter is insignificant – the most important thing is to ensure that you have completely highlighted the letters). You should choose letters, including all spaces, having from 2 to 5 symbols, but in such way that the intervals are various.
10. Select Move Tool
11. Deselect by pressing ctrl +D. Now you may have something like that:
12. Now unhide and select "2" layer (click on the eye near the layer, then on the layer itself) and select the letters as described in the ninth point, but with the exception that you should not chose the very same letters, and preferably in a way such that the main portion of the letters was neighboring the previous ones in the previous layer.)
13. Select Move Tool (V) and drag the chosen portion about 7-10 pixels upwards.
14. Deselect by pressing ctrl +D. Now you may have something like that:
Now it is time to move on to the ImageReady parts.
Part2
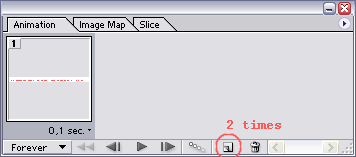
1. Open ImageReady2. In the Animation panel (if you cannot see such panel, then go to Window > Animation) duplicate the first frame twice (double-click on Duplicate Current Frame 2 times)
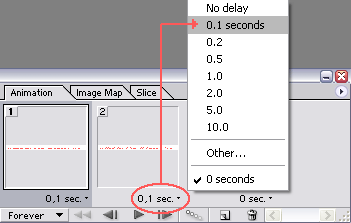
3. Set a delay of 0.1 seconds between the frames.(under the described frame click on the drop down menu, where you will choose 0,1)
4. Choose the first frame. Make only the layer with the original text visible.
5. Choose the second frame. Make only "1" layer visible.
6. Choose the third frame . Make only "2" layer visible .
7. You can test your results by clicking on Play/Stop animation on animation panel.
That's all there is to it. All that remains to be done is to save the picture - File > Save Optimized as…. (Ctrl+Alt+Shift+S), give it a name and push Save.
I hope this tutorial was helpful for you and helped you better understand how to work with animated figures (and Pink Elephants ).
).
By Dustin Kein
