Learn how to use some brushes and blending techniques to decorate a photo's background
Open the picture below, then press Ctrl+J to duplicate layer
Use Pen tool to make a selection like this:
Click on the eye of layer background to hide that layer
Hit Delete key, you will have:
Click on the eye of layer background to show it again, pick Gradient tool and set properties like this:
Apply gradient color to layer background, you will get the result:
You can put some text on layer background
Pick Brush tool and select these brush (Download these brushes at the end of this tutorial)

Apply brush to background layer, you will get the result:
Add a text to the picture, in this tutorial I used font Transylvania
Select layer "Background copy" then press Ctrl+B to open Color Balance, set properties like this:
You will get:
Open Brush tool and pick this brush:
Apply it to the picture:
Merge Visible all layers then use Crop tool to crop the picture like this:
Go to Image -> Adjustment -> Brightness/Contrast to adjust the contrast of picture
Press Ctrl+B to open Color Balance

Press Ctrl+L to open Levels, set properties like this:
Finally, you will get the result: Read more...
Your ride is not so fly? Pimp it out by throwing on some new D's. In this tutorial, you'll learn how to change the color of your rims to gold. Now you too can ride in style.
First off we have to pick out a car. Any car will do the job just fine; I went with the poor man’s Ferrari/Corvette ZR1.

Before doing anything, make sure you have your pen tool set to the following settings.

Make a new layer and zoom in about 800%. Start outlining the wheel on the car and make your way around the wheel until the pen dots disappear and a circle forms.

Using the color #dfc855 fill in the circle and set the blending option to color burn.

Repeat the same procedure until all the wheels are gold.

And if you want to make the color lighter or darker just simply duplicate the color layer and change the blending option to multiply (darker) or soft light (lighter).
Read more...
Written by: Ted Burns
Photos by: Daniel Chinchay
 Wide angle lenses are best suited for landscape pictures. A great landscape view for a picture depends largely on the amount of light falling on its location.
Action, Lights and Location
After selecting the location which you feel will enable you to capture a great picture, evaluate the amount of light available in the area. If this is for an important picture, make the effort to consider the effects of light at different times over the course of 24 hours and decide during which part of the day the light will be most beneficial.
Once you have done this, you can then determine which features or additional components added to your camera foreground will help to produce a more enhanced effect and depth for the picture. Don't discount the possibility of using other nearby areas as well for an even better shot. Sometimes the greatest landscape backgrounds are available in locations you might not ordinarily consider. You might also try taking pictures from different angles to weigh their impact on the snapshots, positive or negative.
To avoid any shadows or darkness appearing over the picture as you take the shot, it is best to capture a view early in the morning or in the latter portion of the afternoon.
 Once you have determined the time of the day to shoot, set up your camera using a tripod. After all, you don't want a shaking hand to diminish the beauty you are attempting to capture. Also, use a light meter to gauge the amount of light, and adjust the aperture and shutter speed accordingly.
Using Natural Effects
You can always add parts of nature in your pictures to help produce a very different, though natural, effect on your picture. For example, sunset moments can be best captured when the sun is touching the horizon. Take the picture about five minutes after this point. It is also advisable to take the picture from as high a position as you can find. And you can also make use of a polarizing filter to highlight sky color and tone. Making use of these techniques can produce an effect similar to a postcard.
Equip Yourself with Necessary Supplies
Normally, to capture a landscape view a photographer will likely need to travel out of the confines of city life. However, any time you travel some distance to take photos, bring extra personal and photography supplies, such as a water bottle, flash light, additional rolls of film, etc. You definitely do not want to migrate several miles from home only to discover you have neglected to bring a sufficient supply of anything you will need!
 Finally, determining which lens is best suited for snapping a particular view is really a matter of experience, skill, and taste. Mastering landscape photography is not a difficult task but requires practice, interest, and skill development. Locating that jaw-dropping view and then capturing the right shot takes both persistence and patience - traits of which many frustrated photographers fall short. If you are not able to capture that stunning landscape photograph the first or second time, don't give up. The landscape isn't going anywhere.
About the Author
For photography and camera information, please visit http://www.photography-and-cameras.com, for practical photography insights.
Begin your work with creating a new file of 1280x1024 px and 72 dpi.
Then we shall use the Rectangle Tool (U) to draw the background of the picture to be.
Set the next shown parameters for the made new layer by making a mouse click on this layer in the layers’ palette. Blending Options>Gradient Overlay
Gradient’s parameters:

Using the Custom Shape Tool (U)
Custom Shape Tool (U).  You use the shape tools to draw lines, rectangles, rounded rectangles, and ellipses in an image. In Photoshop, you can also draw polygons and create custom shape libraries to reuse and share custom shapes.
'); return false">Custom Shape Tool (U), try to represent the rays coming out of the central picture’s part.
Mark out the inside tops, applying the Convert Point Tool (holding on SHIFT button) and then press CTRL+T, while using Maintain aspect ratio for getting together the rays in a single point on the central part of the picture.
The layer’s parameters: Opacity 70%, Fill 0%
Blending Options>Gradient Overlay
Gradient’s parameters:

Create now a new layer (Create new layer) and select a standard brush of black color, Brush Tool (B)
Brush Tool (B).  The brush tool is used for making good backgrounds and also on new layers they have different types so that you get a different effect with every brush you use.'); return false">Brush Tool (B) (Opacity of 10%) to dark out the picture’s edges.

Next we shall write the word STYLE, representing each letter on a separate layer.

Select the parameter Free Transform>Skew for each letter, changing also their shape the same way demonstrated next picture:
Merge down the layers containing the letters of the word STYLE. It’s necessary in this case to press Ctrl button, mark out the corresponding layers and then press CTRL+E. We need after that to represent a kind of train of the word STYLE. This time we shall hold on CTRL+Alt buttons while pressing several times the cursor button (on the keyboard).
Merge Down the multiplied layers, except the one from the top (the layers containing the STYLE word) in a single layer (press Ctrl button for accentuating the appropriate layers and then press CTRL+E). Set the next parameters for the last layer we’ve got. Blending Options>Gradient Overlay
Gradient’s parameters:
Blending Options>Stroke

Merge Down the last layer with the demonstrated above parameters. It’s necessary in this case to create a new layer above the one we work with (Create new layer) and press Ctrl button to mark out both of the layers and only after that press CTRL+E.
On this layer we shall use the Burn Tool (O) to put some shadows on the voluminous parts of the letters.
On the same layer we shall use the Dodge Tool (O) to draw several highlights.
Set the next shown parameters on the top layer containing the letters. Blending Options>Gradient Overlay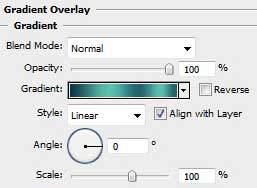
Gradient’s parameters:
Blending Options>Stroke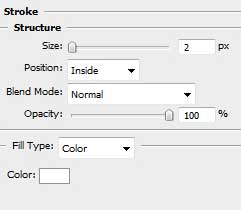

Choose the Line Tool (U)
Line Tool (U).  The line tool is used to draw straight lines on the canvas. It is pretty intuitive, you simply choose the line tool from the toolbox, click once on the canvas to specify the beginning point of your line and then drag the mouse to define the line extending from the starting point.'); return false">Line Tool (U) to create the vertical lines of white color, showing the edges of the voluminous letters.
Select the Pen Tool (P)
Pen Tool (P).  allows you to make lines that change colour and shapes on the project.'); return false">Pen Tool (P) now for drawing a band of black color, applying after that the Convert Point Tool for making the appropriate corrections on its shape.
The layer’s parameters: Blending Options>Gradient Overlay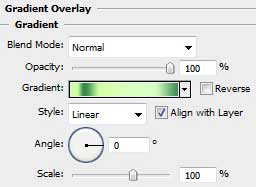
Gradient’s parameters: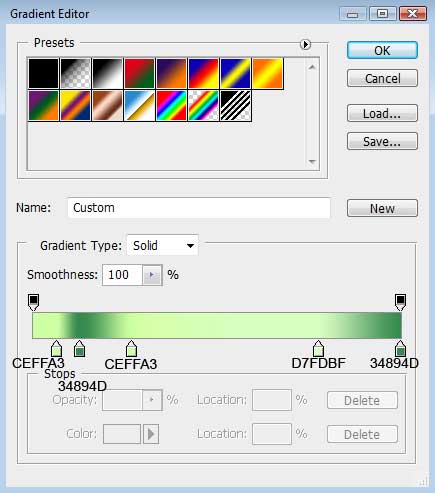

Using the last applied tools, it’s possible to draw one more band, like the one from next image: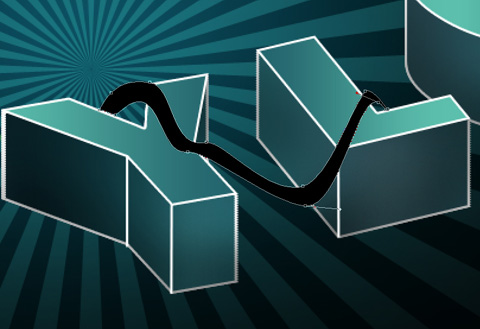
The layer’s parameters: Blending Options>Gradient Overlay
Gradient’s parameters:

It’s necessary to draw the third band too:
The layer’s parameters: Blending Options>Gradient Overlay
Gradient’s parameters:


Combine in a group all the layers containing those three bands (press Ctrl button to mark out the necessary layers and then hold on the left mouse’s button while taking the marked layers on Create a new group selection). Make a copy of the last made group and move off the layers’ effects. After that we shall use the Free Transform option to displace the layers the same way shown below:
Merge down the group containing the black bands, representing the shadows and then press Ctrl+E. Make a click on the same layer on the bottom part of the layers’ panel on Add a Mask selection. Then apply the Brush Tool (B)
Brush Tool (B). The brush tool is used for making good backgrounds and also on new layers they have different types so that you get a different effect with every brush you use.'); return false">Brush Tool (B) of black color to erase the unnecessary parts of the shadows.

Create a new layer and select the above mentioned brush of white color to draw a kind of ornament like that one from the next image:
The layer’s parameters: Blending mode-Overlay
Create a new layer again and use on it the same brush used before for drawing several more elements of the same ornament, started at the beginning. The color is white.
Select the parameters from here for the layer: Filter>Blur>Gaussian blur

Set the parameters from below for the same layer: Fill 50%
Using the Pen Tool (P)
Pen Tool (P). allows you to make lines that change colour and shapes on the project.'); return false">Pen Tool (P) and the Convert Point Tool by turn, it’s possible to represent three more elements on the ornament, having the color #545E4E


Finished!
Read more...
Free Domain
