Self Writing Text  

Posted in ,

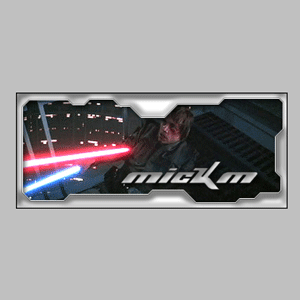
This time you will learn how to make a self-writing text. See how it looks:

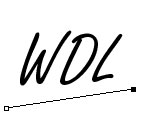
1. Start a new document 400x400. Select Type Tool (T) and write any text you want. In this tutorial we'll use a “WDL” text. Set the font family " Freestyle Script" or any font that looks like hand-writing, text size 72.

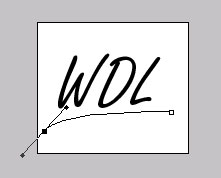
2. Select Pen Tool (P). In Shape Tools options choose Paths. Click where you want the path to begin. Then click where you want the path to end.

With the left mouse button held down, drag the points to make accentuation shape.


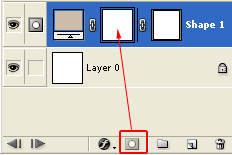
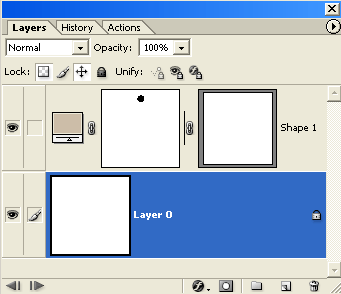
3. Select Brush Tool (B). Set Hard Round 3px Brush. Now go to Window>Brushes (F5) and use the following "Shape Dynamics" settings: Control: "Fade" 150. Create new layer (Ctrl+Shift+N). Select Pen Tool (P) again, right click on the shape and select Stroke Path... Use Brush to stroke. Repeat Stroke Path one more time.

Now it's time to switch to ImageReady (Ctrl+Shift+M)

The main idea is that in each frame you should delete almost whole image, leaving the already written lines. Each frame should contain a bit more image in comparison to the previous one, until the whole phrase is written… But let ' s do it step - by - step :

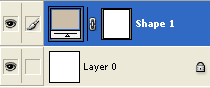
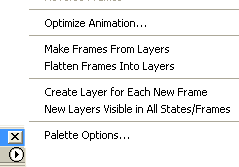
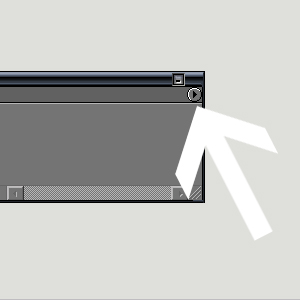
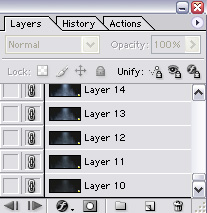
1. First you should prepare your workspace. In Layers Palette you should have something like this:

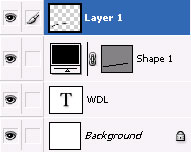
Select Shape 1 layer (left mouse click) and delete it (Layer>Delete Layer). Then select Layer 1 and merge it with WDL text layer (Layer>Merge Layers or Ctrl+E). Duplicate it (Layer>Duplicate Layer or Ctrl+J). Hide "WDL" layer (just click on the eye left to the layer).

Call rulers (View>Rulers) and start adding lines (just drag ruler to the place you need). Add every 5 px horizontal rulers on the WDL text. This will show you writing stepping.

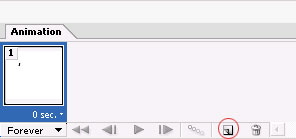
Open Animation Panel (Window>Animation)

2. Now everything is ready. The first frame should contain the beginning of the text. In our case it is the upper left part of the “W” letter. Select Eraser Tool (E) and erase everything, except the upper left part. In animation panel set frame delay time to 0.04. The first frame is ready.

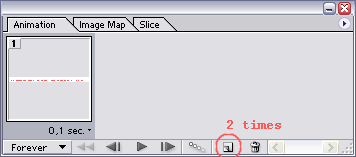
3. Click the Duplicate Current Frame button on the Animation panel.

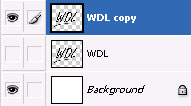
Now make invisible your top (WDL copy) layer. Duplicate WDL Layer and make this duplicate visible. Select this layer.

As in step 2, select Eraser Tool (E) and erase everything, except the upper left part, but now leave some more (remember about rulers - use them to measure how many you should erase).

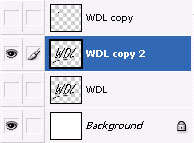
4. Repeat step 3 until you see the frame which will contain all letters and underlining.

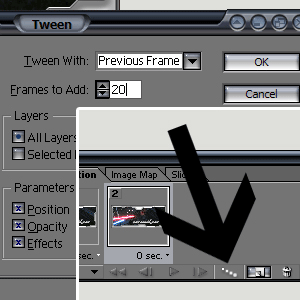
5. Make new empty frame. Then click on Tween in Animation panel and use the following settings:

This is done to make your text disappear after it is written.

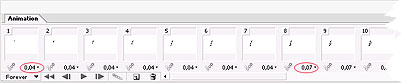
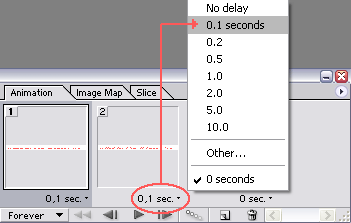
6. Now it's time to change the frame delay time. To make your animation look more realistic, you should change the delay time in some places. The biggest delay should be between your letters (about 0.35 ms). Also, you may set a small delay in the sharp curves of the letters (about 0.06 ms). The last frame should have the 0.6 ms delay .
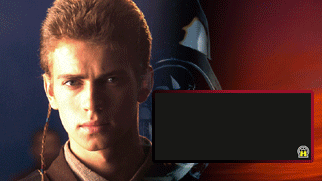
Animation1
Click to enlarge

7. That's it! You can use this effect for you signings, greetings and other – looks very impressive!

Self Writing Text Tutorial: Final Result


Read more...

Photoshop Shining Text Animation  

Posted in ,

Follow these guidelines to create the signature.

1. Make a signature and add a text-layer (Make sure the layer doesn't have any layer-style)

A fancy text animation

2. Create a new layer;

Grab your gradient-tool and set it to Reflected Gradient

image 2


3. Create something like this and press: Ctrl+I

image 3

4. Press: Ctrl+U and set it to your favourite color;

Press Ctrl+G and set the blending option to "Lighten";

And press this button

image 4

5. When in Image-Ready, select the gradient-layer;

Move it all the way out of the text so that you can't see it (left);

Press this button and select "New frame"

image 5

6. Press right until you see the gradient move to the other side of the text-area;

Press this button and select these options

image 6

7. Save Optimised as, and it should look like this

A fancy Text-animation Tutorial: Final Result


Read more...

How to import video into Gif-file  

Posted in ,

If you have a small video clip, then it's possible to import it into .Gif and use it as part of an animated banner or as a stand-alone cool signature.

This tutorial will work in Image Ready 7.0 or higher. Note that Image Ready CS compresses the .gif to a smaller file size (almost 3x smaller) than Image Ready 7.0.

1. Open Adobe Image Ready.

2. Prepare the video clip in .mov format.

3. Click File > Open...(Ctrl+O) and select your video clip in .mov format. (I used the preview to Star Wars episode III).

The following dialog box will open:

Open Movie

Select the option you need (from the beginning to end uses the whole movie, selected range is only a part). And don't forget to limit frames to decrease size of .gif file (the larger the font size, the smaller the frame will be, and accordingly the poorer the quality and the smaller the size).

4. The next step is to set the timing of your video clip. Image Ready normally sets it too fast. So we have to decrease it. Simply select all frames in your animation window by clicking the first frame, holding shift and clicking the last frame and then click on the timing. Set it at about 0.12.

Set Frame Delay

5. Check to see if your animation runs smooth in Internet explorer IE (Ctrl+Alt+P).

6. Now it's time to change the movie to the needed size and set its necessary rotation. Link all layers (if you check all the boxes you will be able to see the target near small pictures in layers palette).

Layers Pallete

Now use Edit > free Transform (Ctrl+T) on any of layers and set desirable size (when resizing, hold down Shift button to save aspect ratio).

7. Now save the result (File > Save Optimized)

You can also add decoration and paste the movie as a frame in the picture. Se what i've done:

Star Wars
Read more...

Photoshop Animated Signature  

Posted in ,

Have you ever had the desire to create a cool signature on a forum, an animated banner, or just something that moves? Here I will tell you how to create an inscription, giving you skills that will serve as the foundation for further experimentation. You can create such things with Adobe Photoshop and Adobe ImageReady. My tutorial will show you how to do something like this:

Pink elephants are frolicking about the room... running and leaping, the pigs are happy.

This tutorial consists of two parts: Photoshop and Image Ready.

Part1:

1. Open Photoshop .
2. Create a new document having the size of 750x50 (pixels).
3.
Select Type Tool Type Tool (T). Set size 16xp, font size - Comic Sans MS, font style – Bold, font color - #FE5858.
4. Type the text: “Pink elephants are frolicking about the room... running and leaping, the pigs are happy.”
5. Duplicate the layer twice (Layer > Duplicate Layer…). Rename the created layers something like "1" and "2".
6.
Rasterize "1" and "2" layers (click on "1" layer and then Layer > Rasterize Layer > Layer. After which you should repeat the same procedure with "2" layer)
7.
Now hide each layer except "1". (click on the eye near the layers you wish to hide) After that select "1" layer (left button click on it).


8. Select Rectangular Marquee Tool Rectangular Marquee Tool (M).
9. Now with the help of this tool, while pressing and holding shift, select the letters in the text (the length and width selected for every letter is insignificant – the most important thing is to ensure that you have completely highlighted the letters). You should choose letters, including all spaces, having from 2 to 5 symbols, but in such way that the intervals are various.
10.
Select Move Tool Move Tool (V) and drag the chosen section about 7-10 pixels upwards.
11.
Deselect by pressing ctrl +D. Now you may have something like that:
1
12. Now unhide and select "2" layer (click on the eye near the layer, then on the layer itself) and select the letters as described in the ninth point, but with the exception that you should not chose the very same letters, and preferably in a way such that the main portion of the letters was neighboring the previous ones in the previous layer.)
13.
Select Move Tool (V) and drag the chosen portion about 7-10 pixels upwards.
14.
Deselect by pressing ctrl +D. Now you may have something like that:

2

Now it is time to move on to the ImageReady parts.

Part2

1. Open ImageReady Jump to ImageReady (click Jump to ImageReady or press Ctrl+Shift+M).
2.
In the Animation panel (if you cannot see such panel, then go to Window > Animation) duplicate the first frame twice (double-click on Duplicate Current Frame 2 times)

Animation Panel

3. Set a delay of 0.1 seconds between the frames.(under the described frame click on the drop down menu, where you will choose 0,1)

Animation Timer

4. Choose the first frame. Make only the layer with the original text visible.
5.
Choose the second frame. Make only "1" layer visible.
6.
Choose the third frame . Make only "2" layer visible .
7.
You can test your results by clicking on Play/Stop animation on animation panel.

That's all there is to it. All that remains to be done is to save the picture - File > Save Optimized as…. (Ctrl+Alt+Shift+S), give it a name and push Save.

I hope this tutorial was helpful for you and helped you better understand how to work with animated figures (and Pink Elephants).

By Dustin Kein

Read more...

Text Effect (Moving Gradient)  

Posted in ,

First off i just want to say that I purposely kept to the basics with this tutorial. For the sake of educating....once people play with it and are comfortable with the basic steps its very easy to start experimenting and vary your results....this was meant to be a tutorial on the general theory without any other complications....have fun.

1) Make dark colored words, background is unimportant.


2) Create new layer, select gradient tool, make sure you are on reflective gradient, and make sure its one of the gradients with the white in the middle and black on the outsides....


3) just off to the right side of the middle of the picture draw a short line near the top of the screen, basically try and duplicate your forward slash but maybe a little longer but not much.


4) At this point you will have your original picture covered by a blackscreen with a white line in it, sittin there goin what the hell this has to be wrong. but its not.


5) Press CTRL-G with your gradient layer selected which should be immediately above your text layer. This makes it so the gradient layer only affects the text not the whole picture.


6) Click File, select edit image in image ready.


7) In image ready select your gradient layer within the layer palette, and position it so the gradient is at the beginning of your word.


8) Create new frame, again select the gradient layer, and this time move it across the word holding shift down so it stays in place, to the end of the word.


9) click the tween button add 15 frames.


10) Hit play tweak the timing as needbe. If it doesnt work delete and start over this time follow directions better.


Something to keep in mind if you are using this to add effects to your sigs or what have you, you must keep in mind certain blending effects on the text will nullify the gradient...im pretty sure mainly color and gradient overlay's are the things that will give you trouble so if its not working check to make sure you didnt use these blending options

Here you can see how i put it to work in a signature, each frame has a .1 second frame delay, except for the last one which i set to 4 seconds to slow the effect down for a more dramatic effect.


This tutorial has been created and brought to you by the Pimps of Pain Design Krew, enjoy!
Read more...

ImageReady Gravity Ball Animation  

Posted in ,

Here's a few simple steps to create a gravity ball animation effect.

Open ImageReady, start a new document. I started with a preset of 297 x 300.
Next, select the 'Rectangle Tool (U)' from the Toolbar, with a foreground color of your choice (I used #CCBDA8) and 'Create New Shape Layer' active on the Options Bar, draw a basic shape as I have captured below.

ImageReady Gravity Ball Animation


This is the Layers Palette view.

ImageReady Gravity Ball Animation


Next, with the 'Shape 1' layer active (highlighted in blue), click the 'Add a mask' button on the bottom of the Layers Palette (encased in red below), to add a new Layer Mask Thumbnail between the Layer Thumbnail & the Vector Mask Thumbnail. (Pointing red arrow).

ImageReady Gravity Ball Animation


Next, activate the new 'Layer Mask' by clicking on it. Then select the 'Pencil Tool (B)', set your foreground color to Black (#000000) and with a brush tip size of 27, (or of your choice) make a single click inside the Shape, and you should have something similar to below.

ImageReady Gravity Ball Animation


And here is the Layers Palette view.
Note: I enlarged the Layers Palette preview so you can see that the above Pencil click is onto the Layer Mask.
As with Layer Masks, painting with Black, HIDES. So essentially, all I did was knock a hole into Shape 1 layer, thus revealing the white color underneath from the default background layer.

ImageReady Gravity Ball Animation


As a final preparation before the animation, turn off the two Links between the Layer Thmbnails by single clicking on them. This will allow us to move the mask around during the animation without having to create additional layers for the effect.

ImageReady Gravity Ball Animation


Lets animate this Mask!

Go 'Window/Animation' to bring the Animation Palette to the foreground.


Make sure that no options are selected from the 'Animation Palette' menu, as captured below.

ImageReady Gravity Ball Animation


To begin:
  • Duplicate current Frame


  • ImageReady Gravity Ball Animation


  • Activate the new frame

  • Click on the Layer Mask Thumbnail
  • Select the 'Move Tool (V)'

  • Hold the Shift key & drag the mask in the desired direction.

  • Repeat process with each additional frames added.


  • ImageReady Gravity Ball Animation


    Here is my final version. Click the DemoReel graphic below, then click the main graphic to Play/Replay.
    Note: My final animation has been tweaked with play back features not outlined in this tutorial.

    ImageReady Gravity Ball Animation


    Summary:

    1. Created a Shape Layer
    2. Added a Layer Mask
    3. With Pencil Tool painted a Black hole onto the LayerMask
    4. Unlinked the Layer Thumnails
    5. Open Animation Palette
    6. Duplicate Frames & with the Move Tool adjusted the position of the Layer Mask to simulate a gravity drop.

    I must point out that this method is quite useful for two reasons.
    A.) The file size of my final animation is only 3k
    B.) Only a single layer was used. The Layer mask did all the work.

    Read more...